Using The System
Installation
Step One
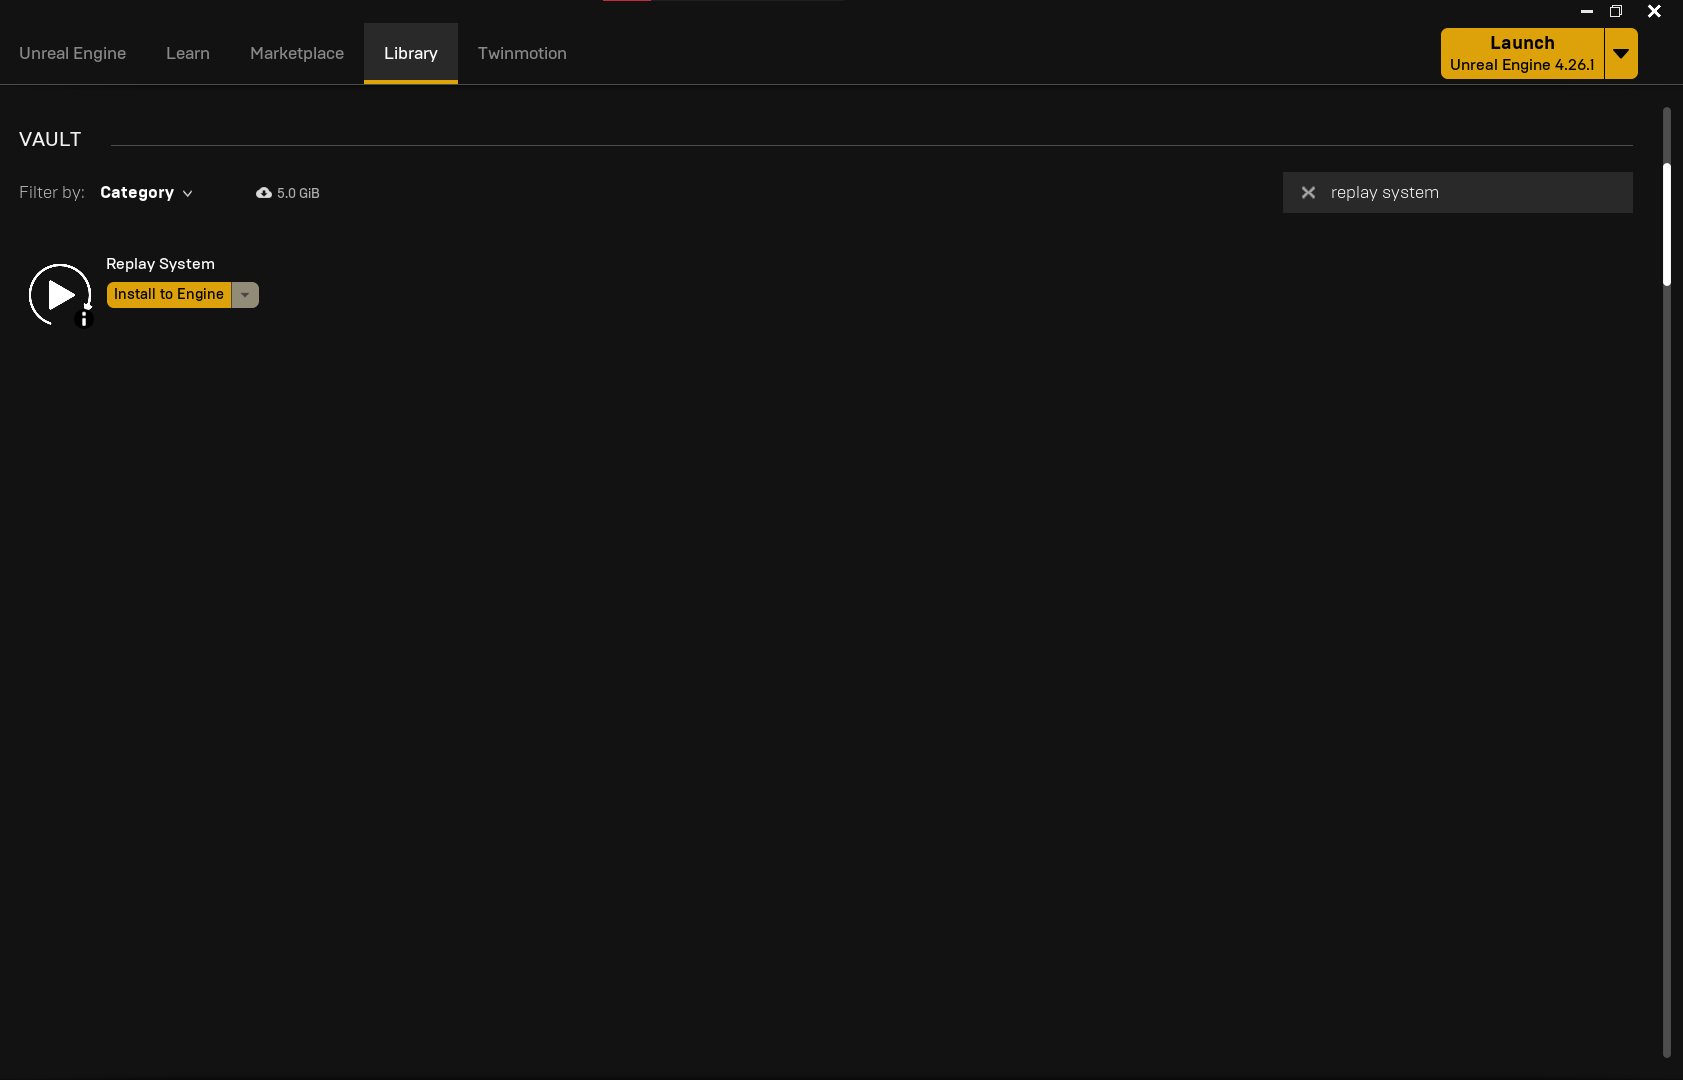
Navigate to your library

Step Two
Search your vault for the Replay System plugin
Step Three
Click on "Install to Engine" then select 4.26 and click "Install".

Project Setup
Step One
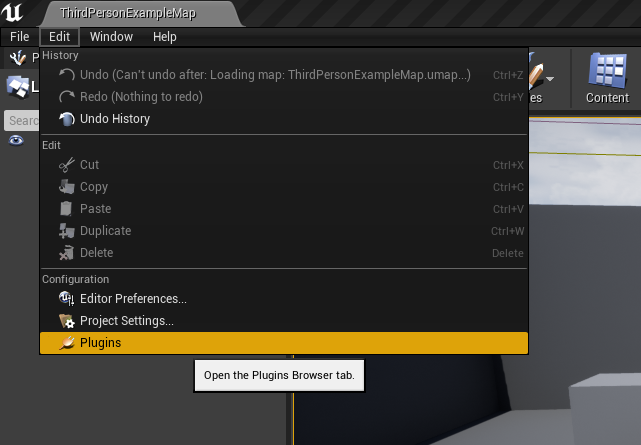
Click on "Edit" in the top left and select "Plugins".
Step Two
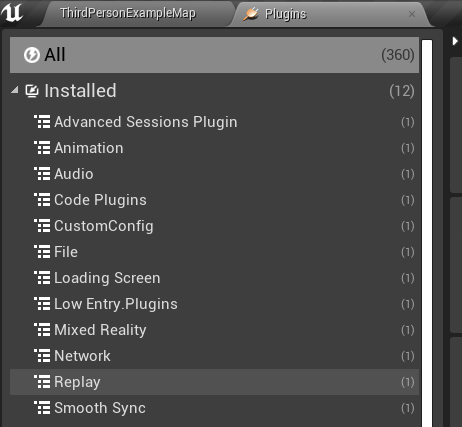
In the "Plugins" window select "Replay" under "Installed".
Step Three
Tick "Enabled" if it isn't ticked and follow the prompt to restart your project (if it wasn't ticked).

Recording Replays
Recording a Replay
In any blueprint class right click and search for "Record".
Select the first option under "Recording".
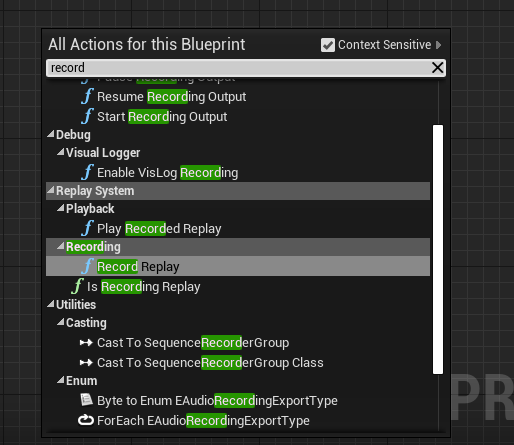
You should now have the node below in your graph.
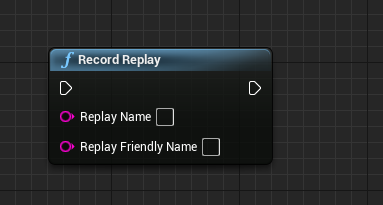
You can set "Replay Friendly Name" to whatever you want but keep "Replay Name" technical because that is the name replay will be saved as on disk.
As shown below.
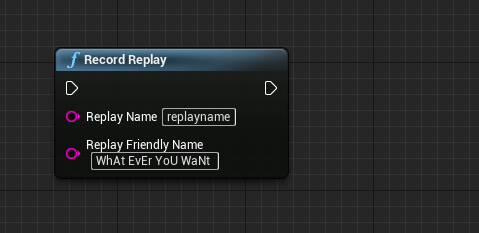
Now once you execute this node (i.e. connect it to something) you will start recording a replay.
Adding Events
We can add an event to a replay once we start the recording.
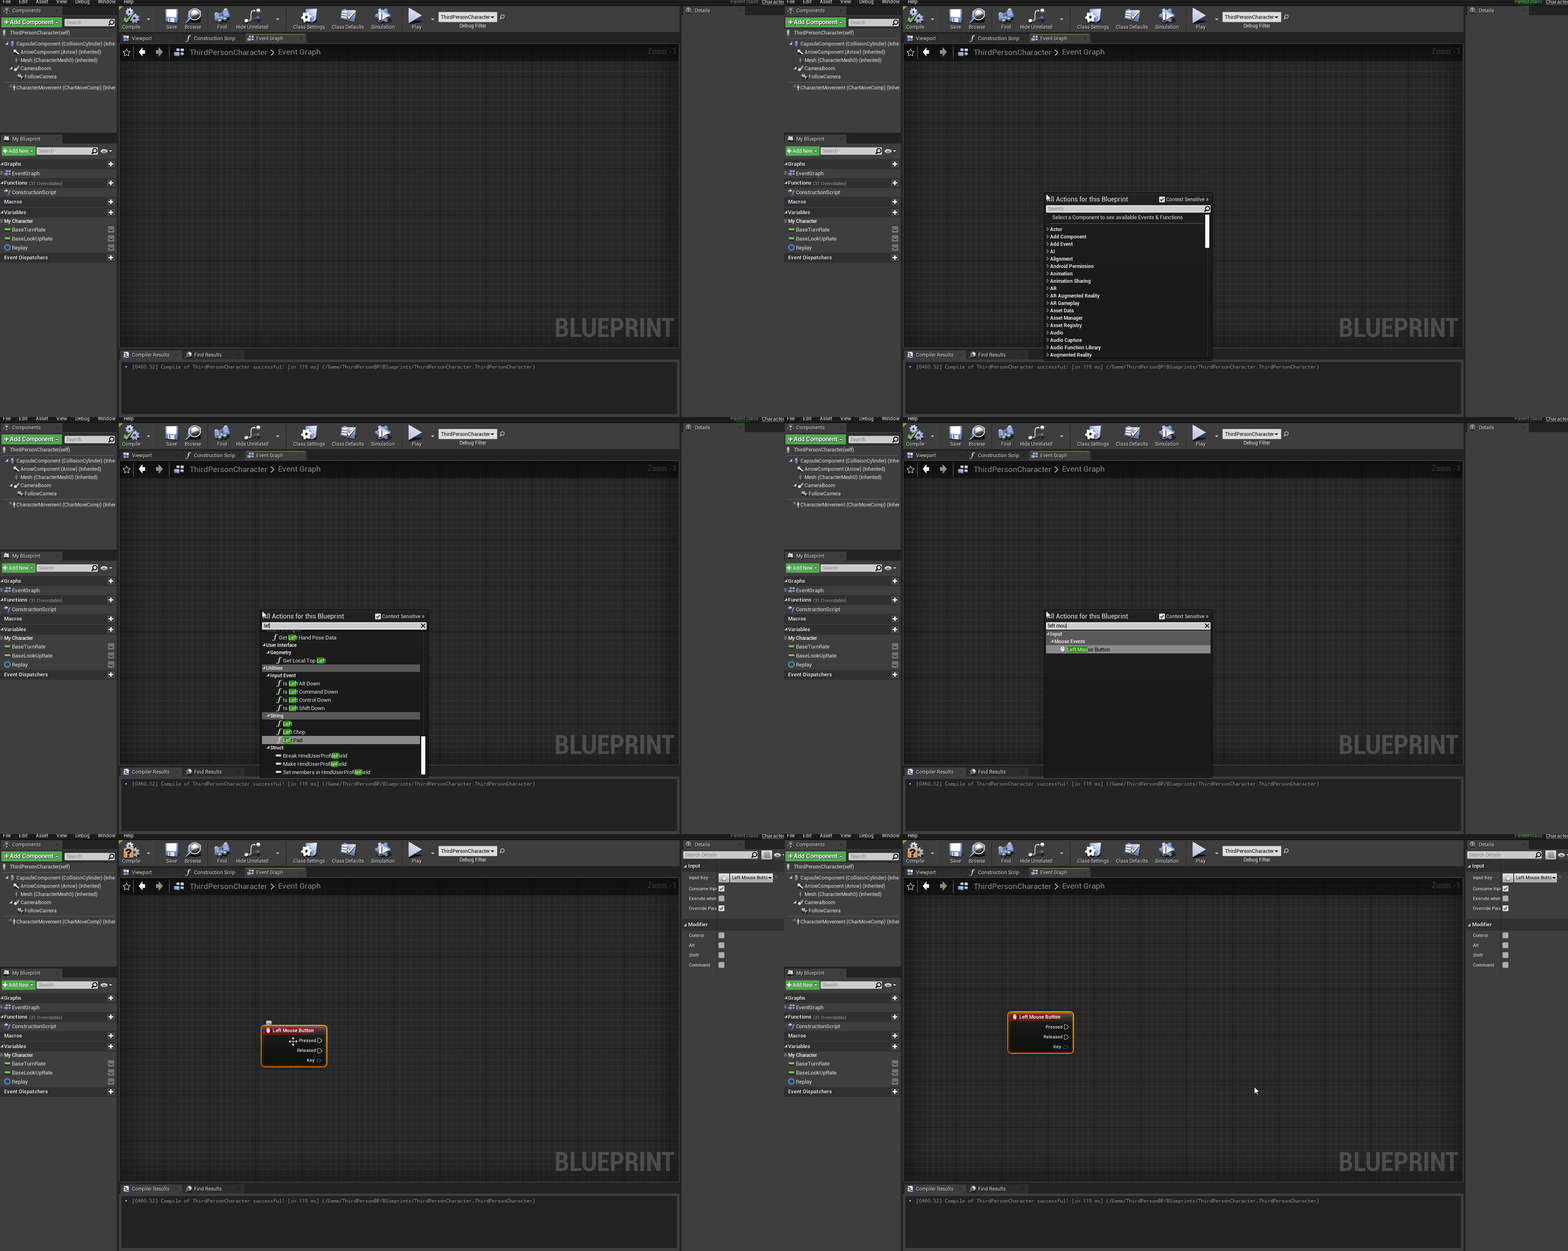
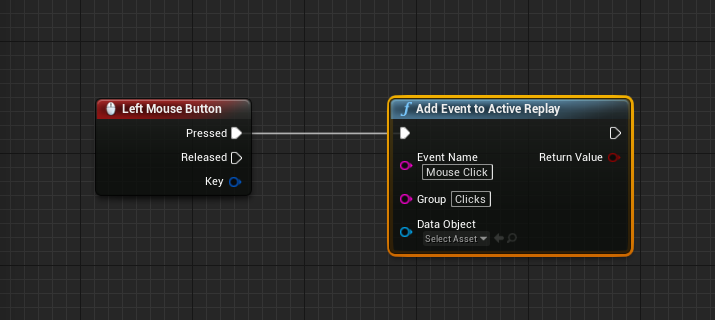
We're going to add an event to the replay when the "left mouse button" is clicked
First drag of from the right click on the graph and search for "left mouse button" and select the first thing under "Mouse Events".
This event will be called every time we press the "left mouse button".
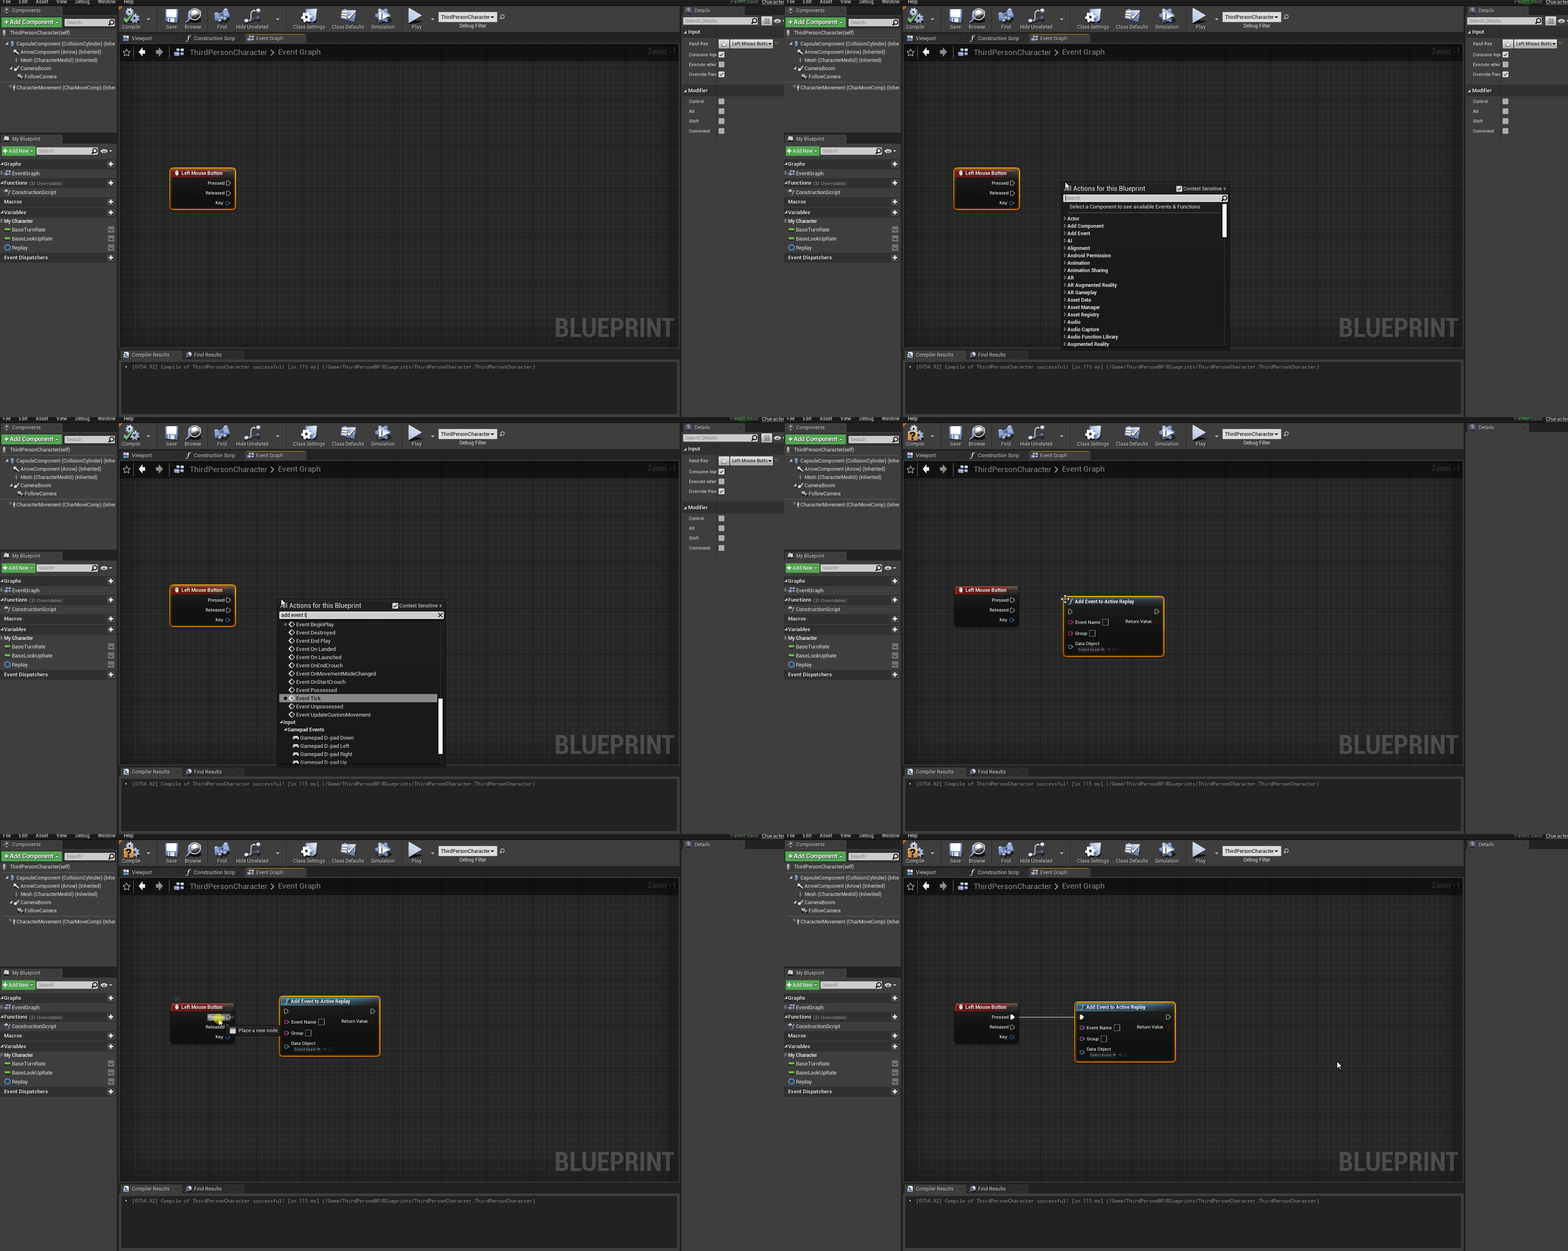
Now we're going to need the node that actually adds the event.
Right click on the graph and search for "Add Event To Active" and select the first node under "Replay System".
Now connect that node to our event from earlier.
Next were going to name the event Mouse Click and set the group to Clicks
Because each event has to have a different name we're going to add the current game time to the event name.
Right click in the event graph and search for "Get game Time In Seconds".
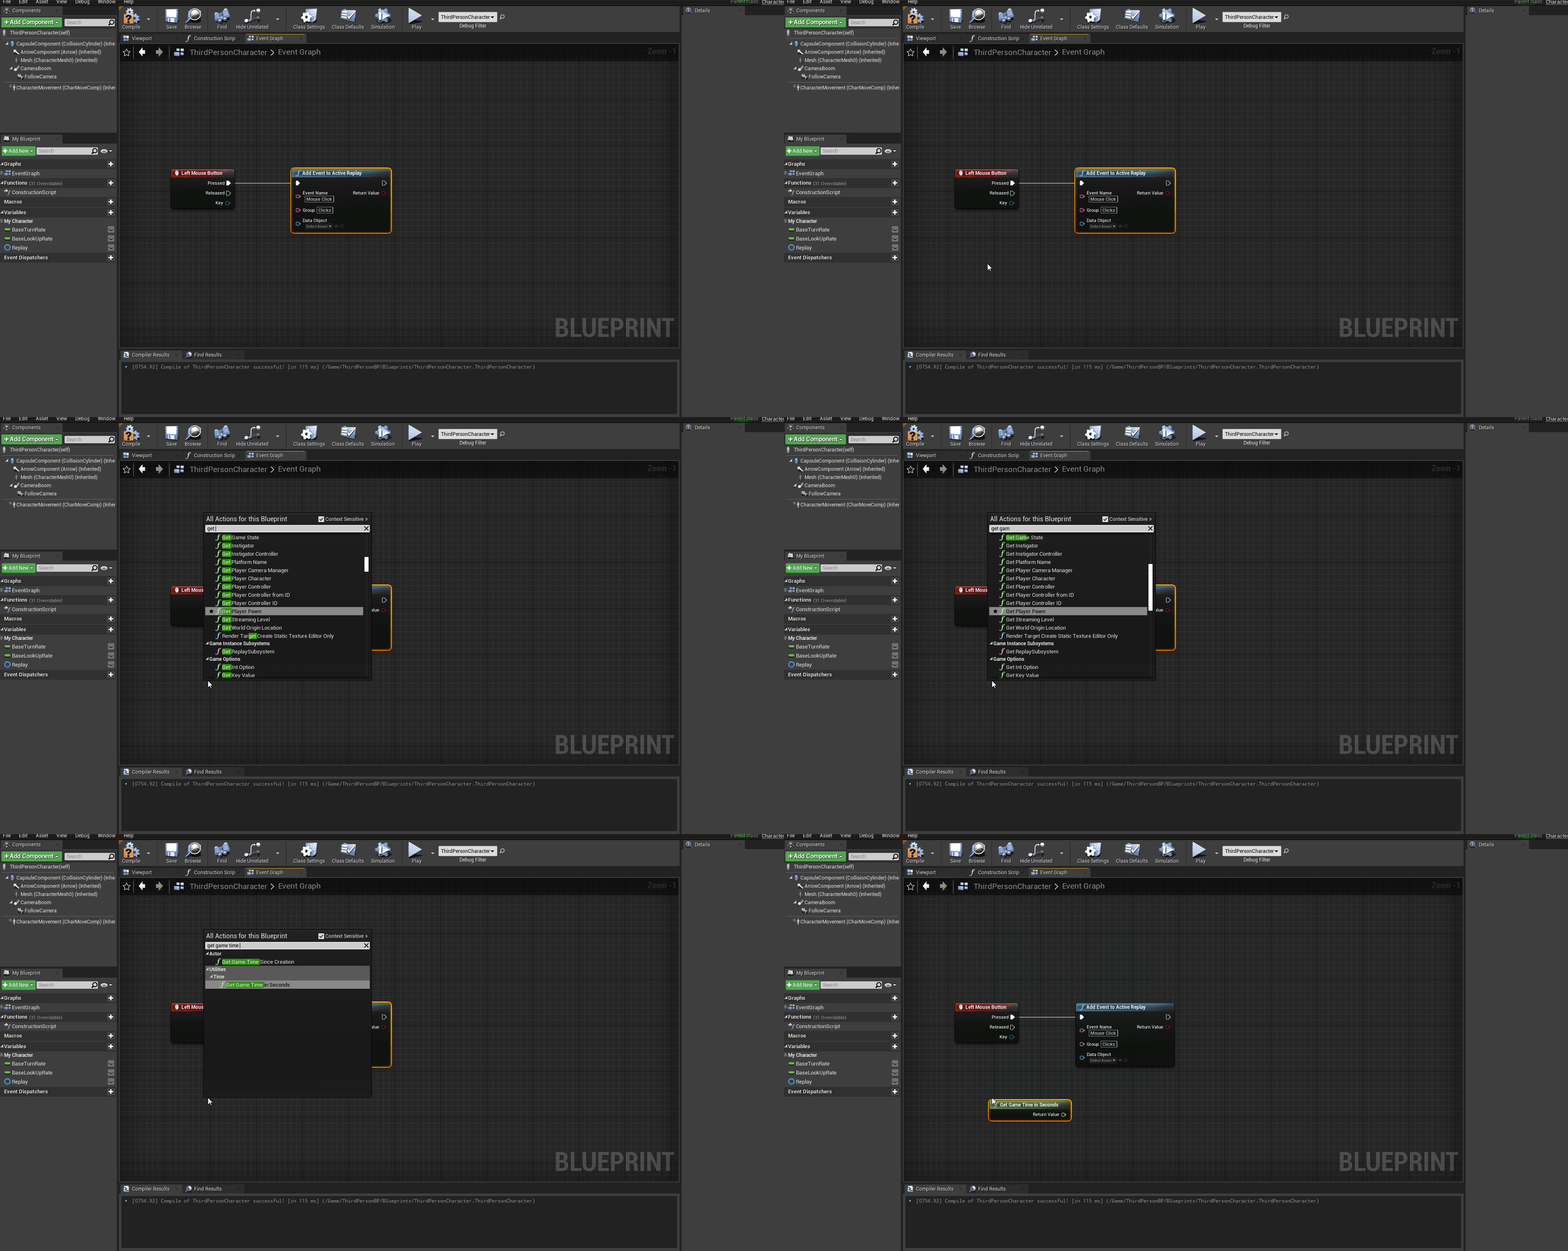
We're going to append the game time to our event name so every time we click the event name will be different.(if its the same it updates instead of adding a new one)
First convert the game time to string then append it to "Mouse Click" and use that to set the event name.
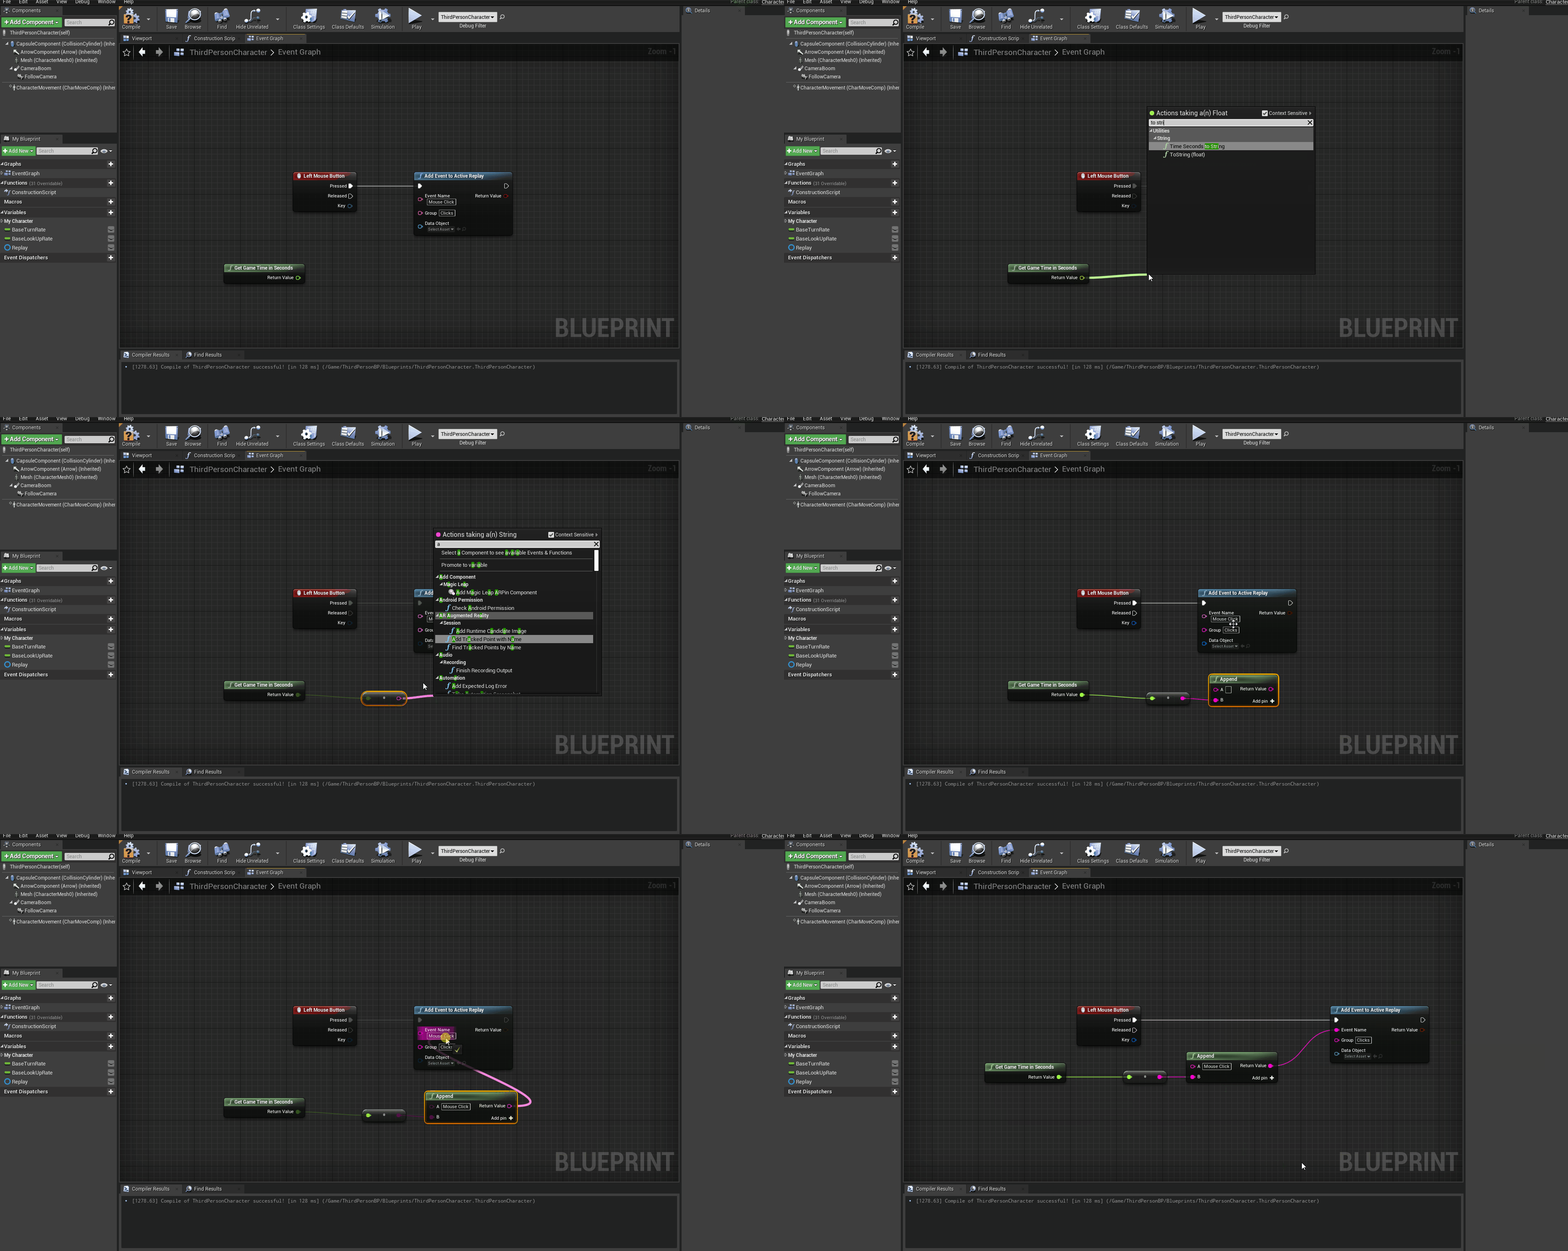
And were done! Now once we start recording a replay and press the "left mouse button" it will add an event to the Clicks group.
Adding Events With Data
Picking up from the previous section we have now added an event to our replay, but what if we also want to store the position of the mouse when it was clicked ?
We can do that using a "Replay Data object" which stores variable data in an event.
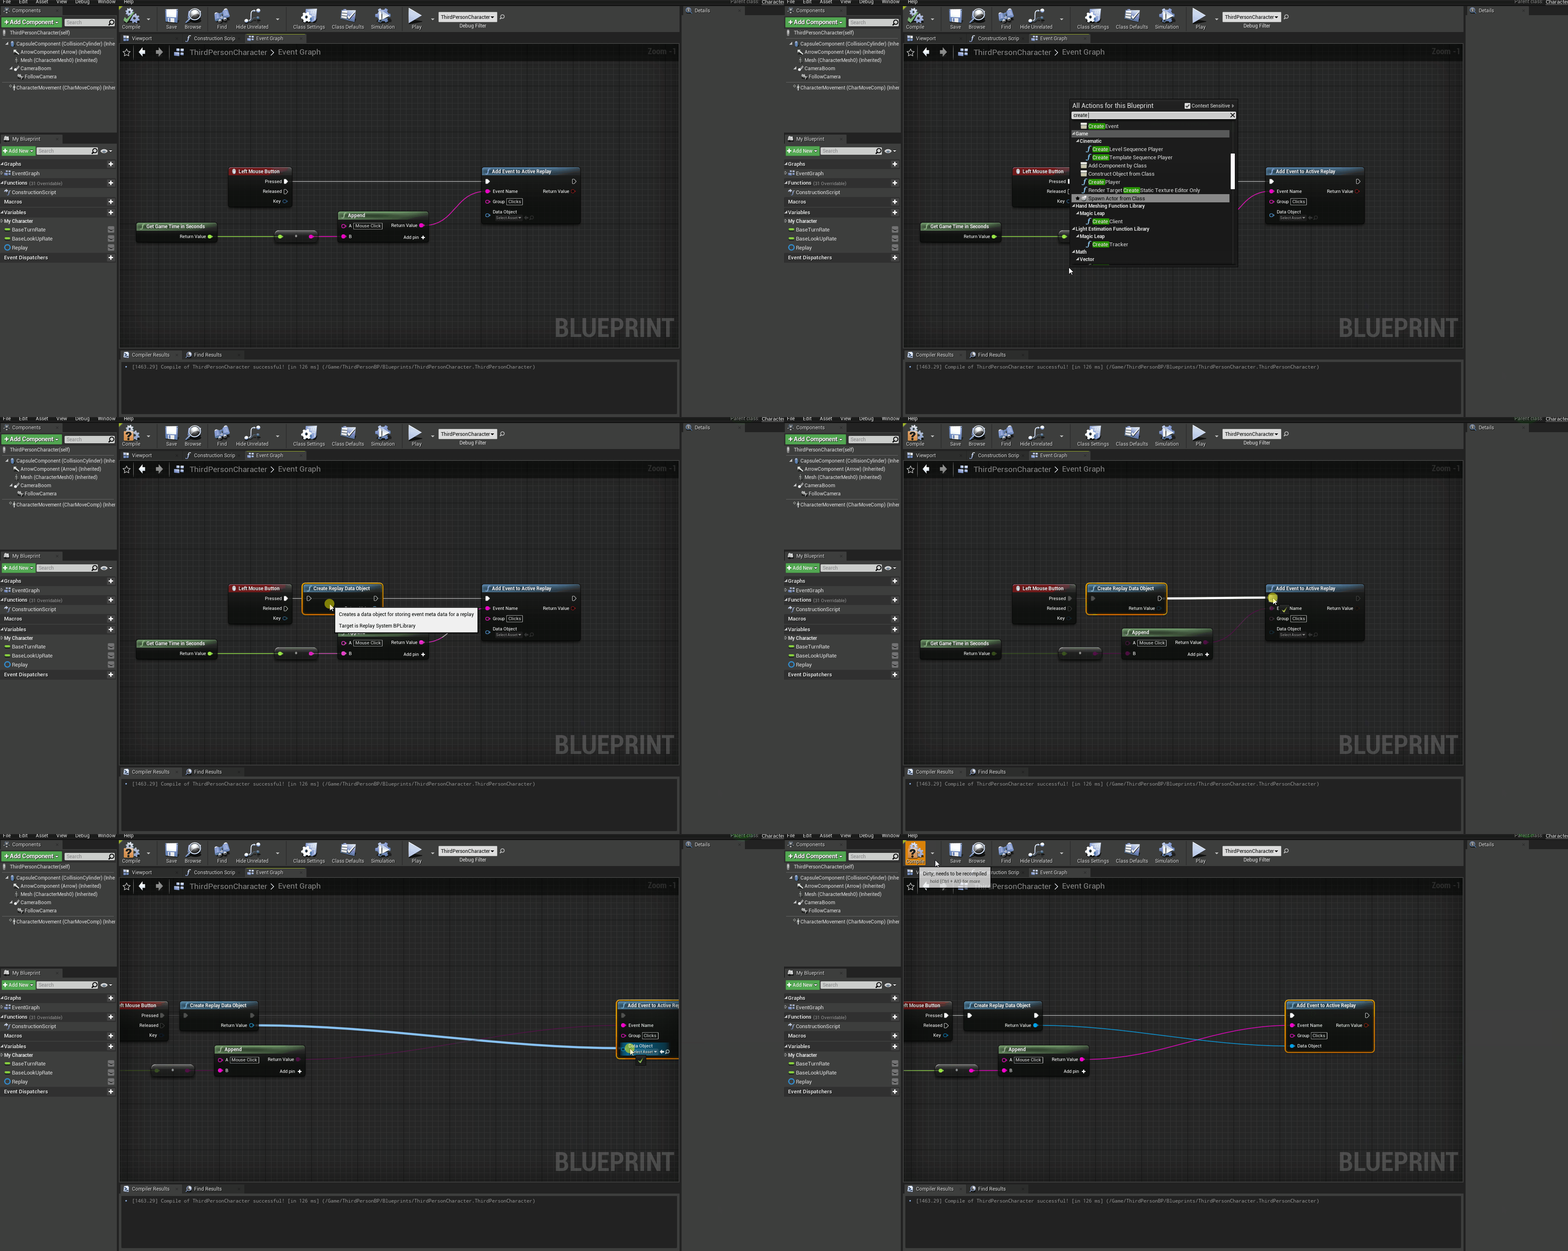
First lets make one, to create one right click on the graph and search for "Create Replay Data Object".
Add the node to the graph just before the "Add Event" node.
Connect the return value of the "Replay Data Object" to the "Data Object" field on the "Add Event" node and leave some space in-between them.
Next we're going to need the position of the mouse on the viewport.Thankfully theres a built in node for that.
Right click in the event graph and search for "Get Mouse Position Scaled".
Drag of the "Player" input and search for "Get Player Controller".
We now have the mouse position in the viewport.
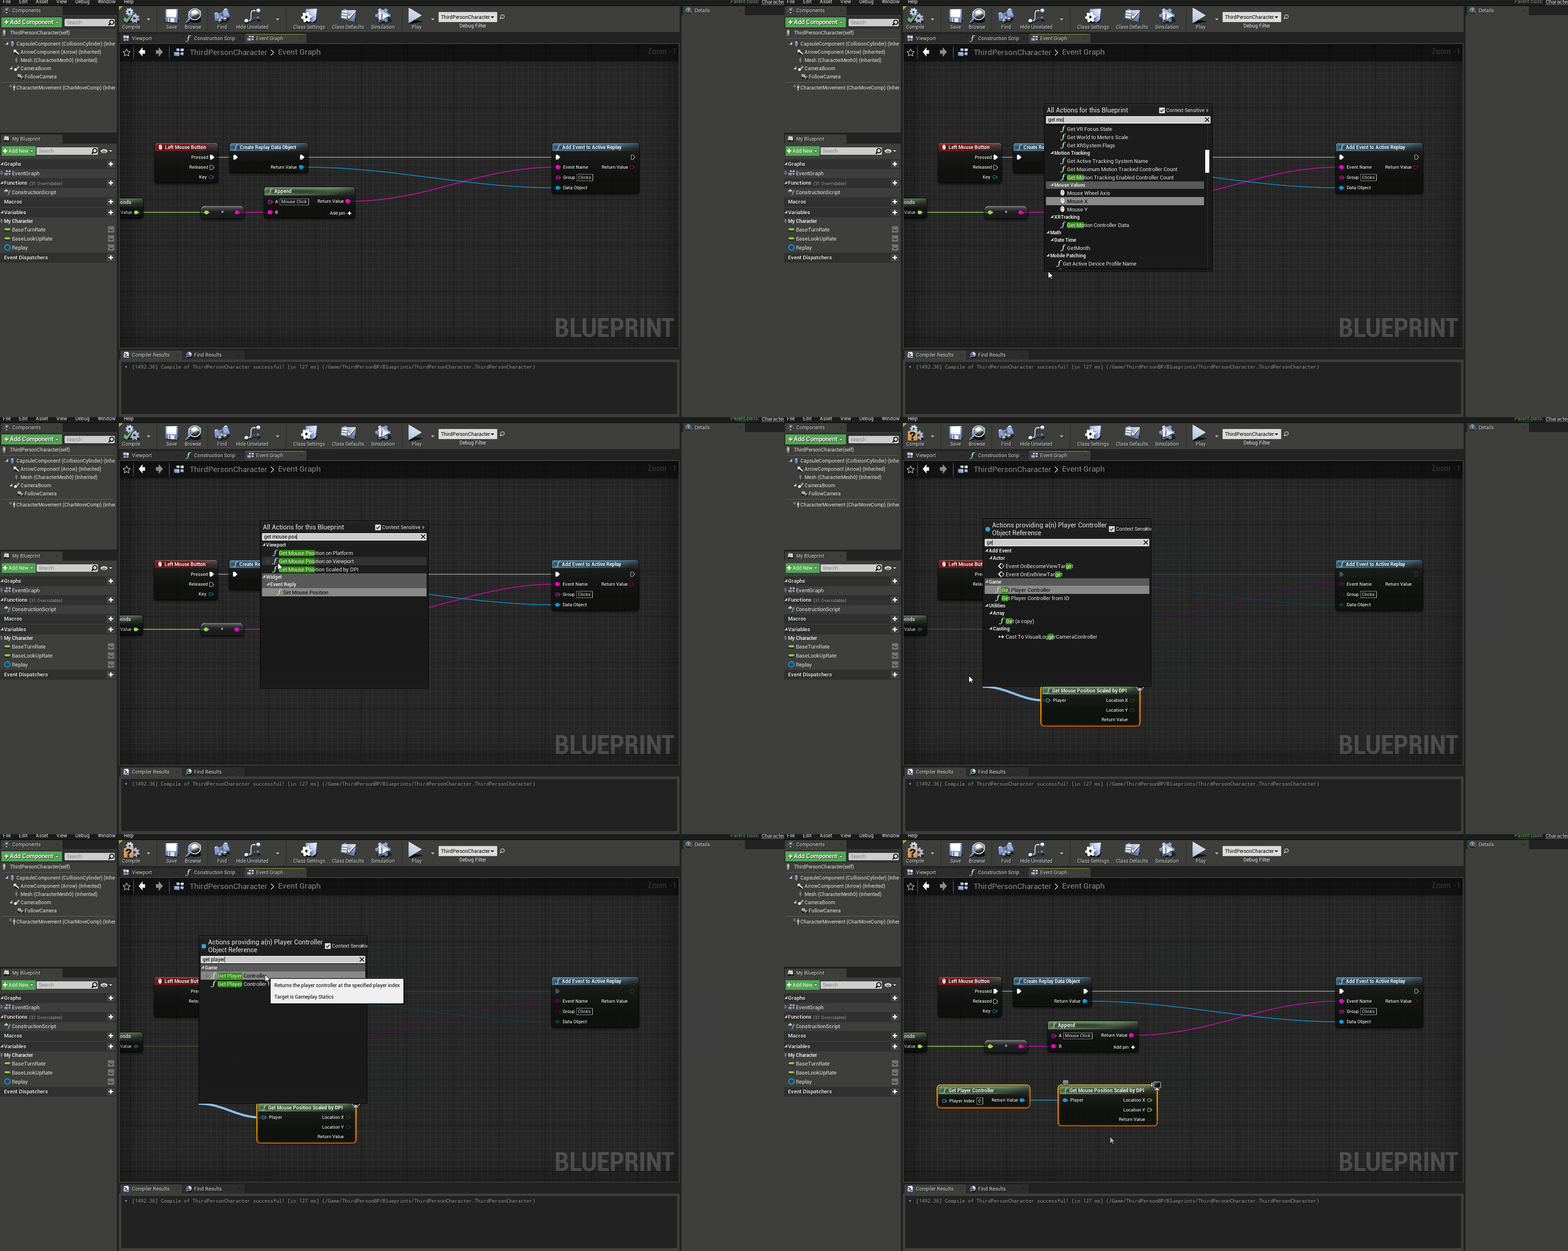
Since the mouse position is a float were going to store it as a float.
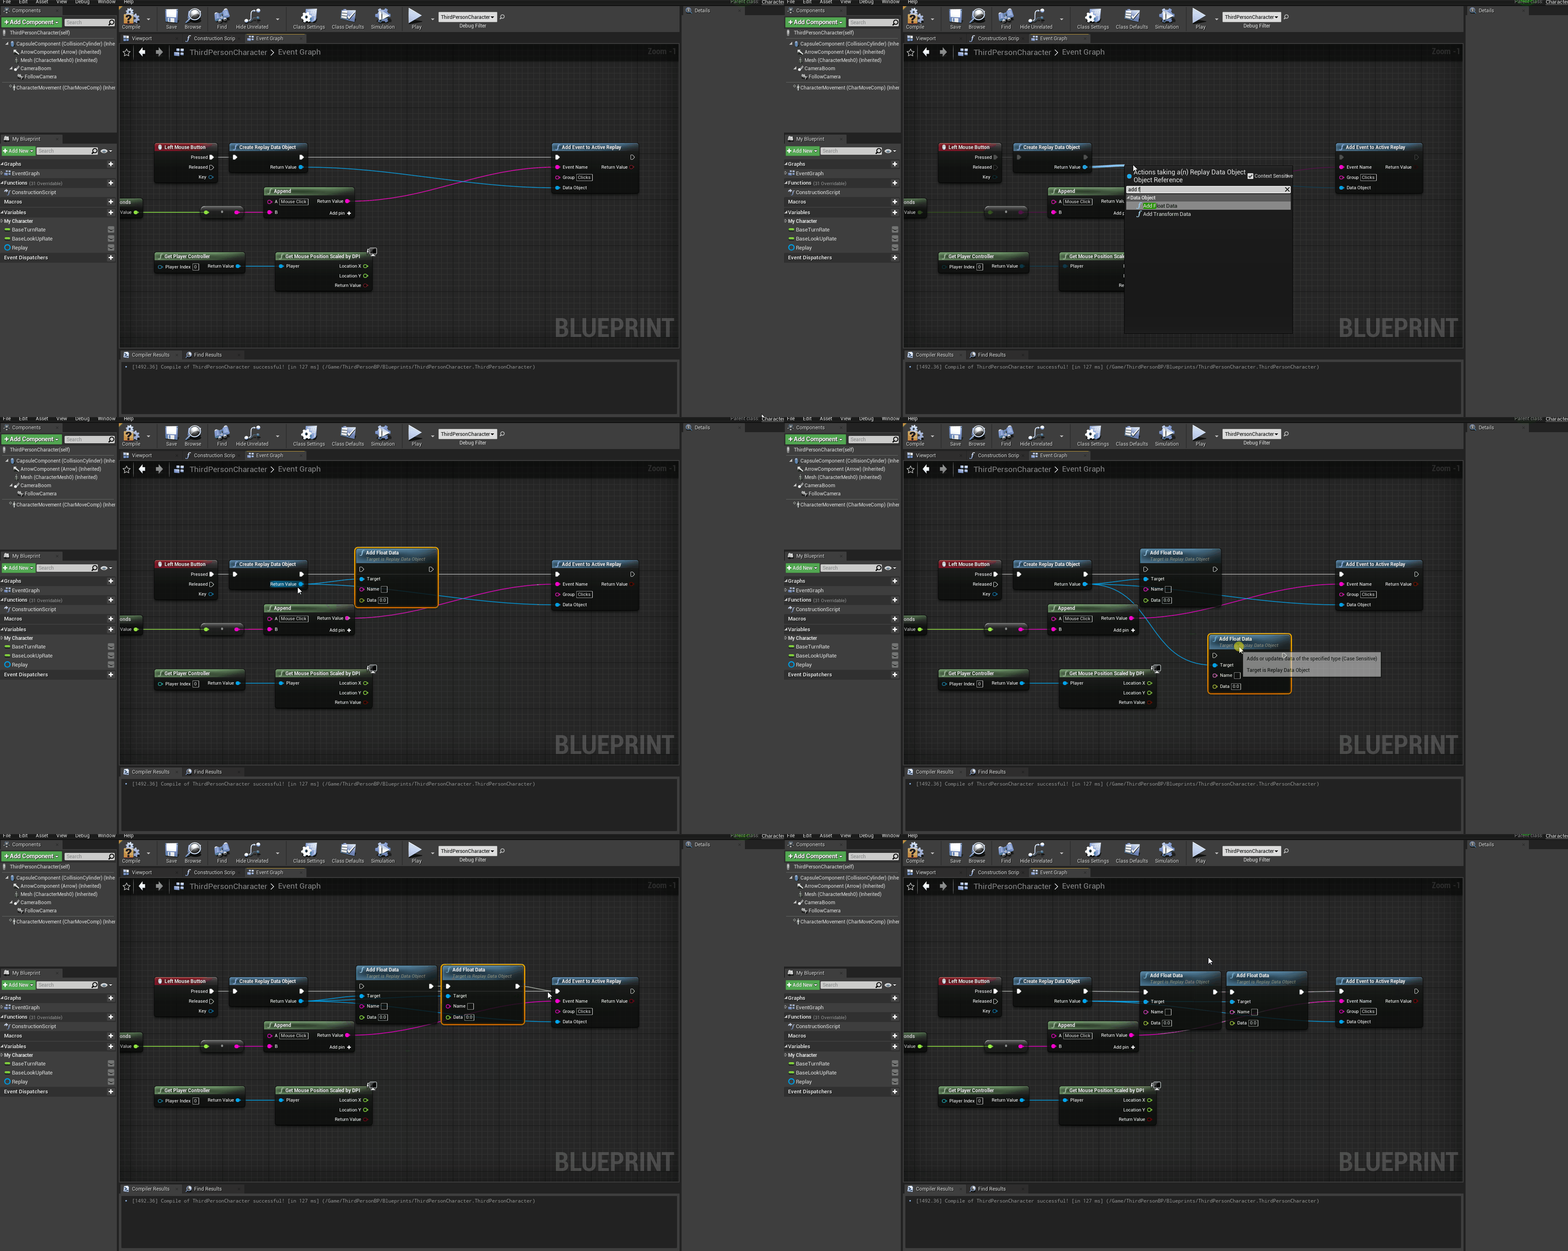
Drag off the return value of the "Create Replay Data Object" node and search for "Add Float Data".
Do this again so we can store the "X" and "Y" values seperately.
Connect both nodes in-between the "Add Event" node and the "Create Replay Data Object" node
Name the first one "MousePosX" and the second one "MousePosY".
Connect each viewport output to its respective node.
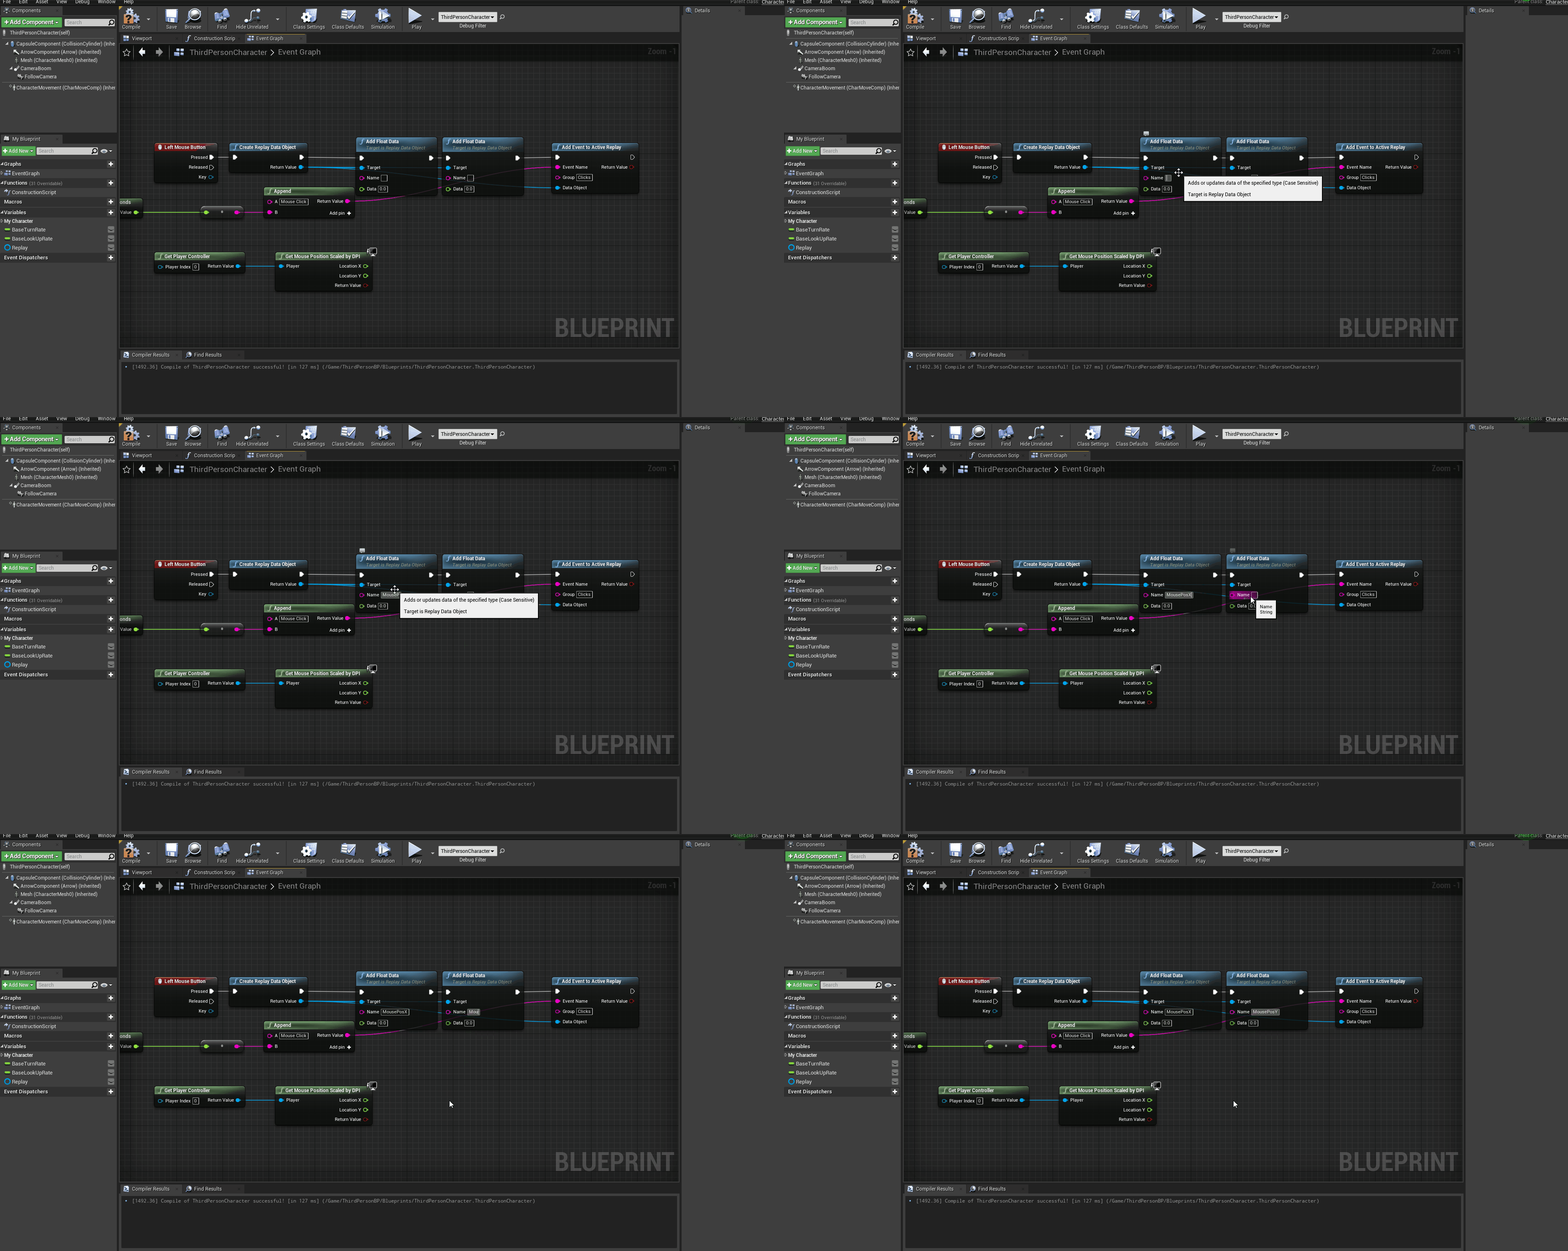
And with that were done.
Now everytime the event is added we also store the current positon of the mouse.
Stopping a Recording
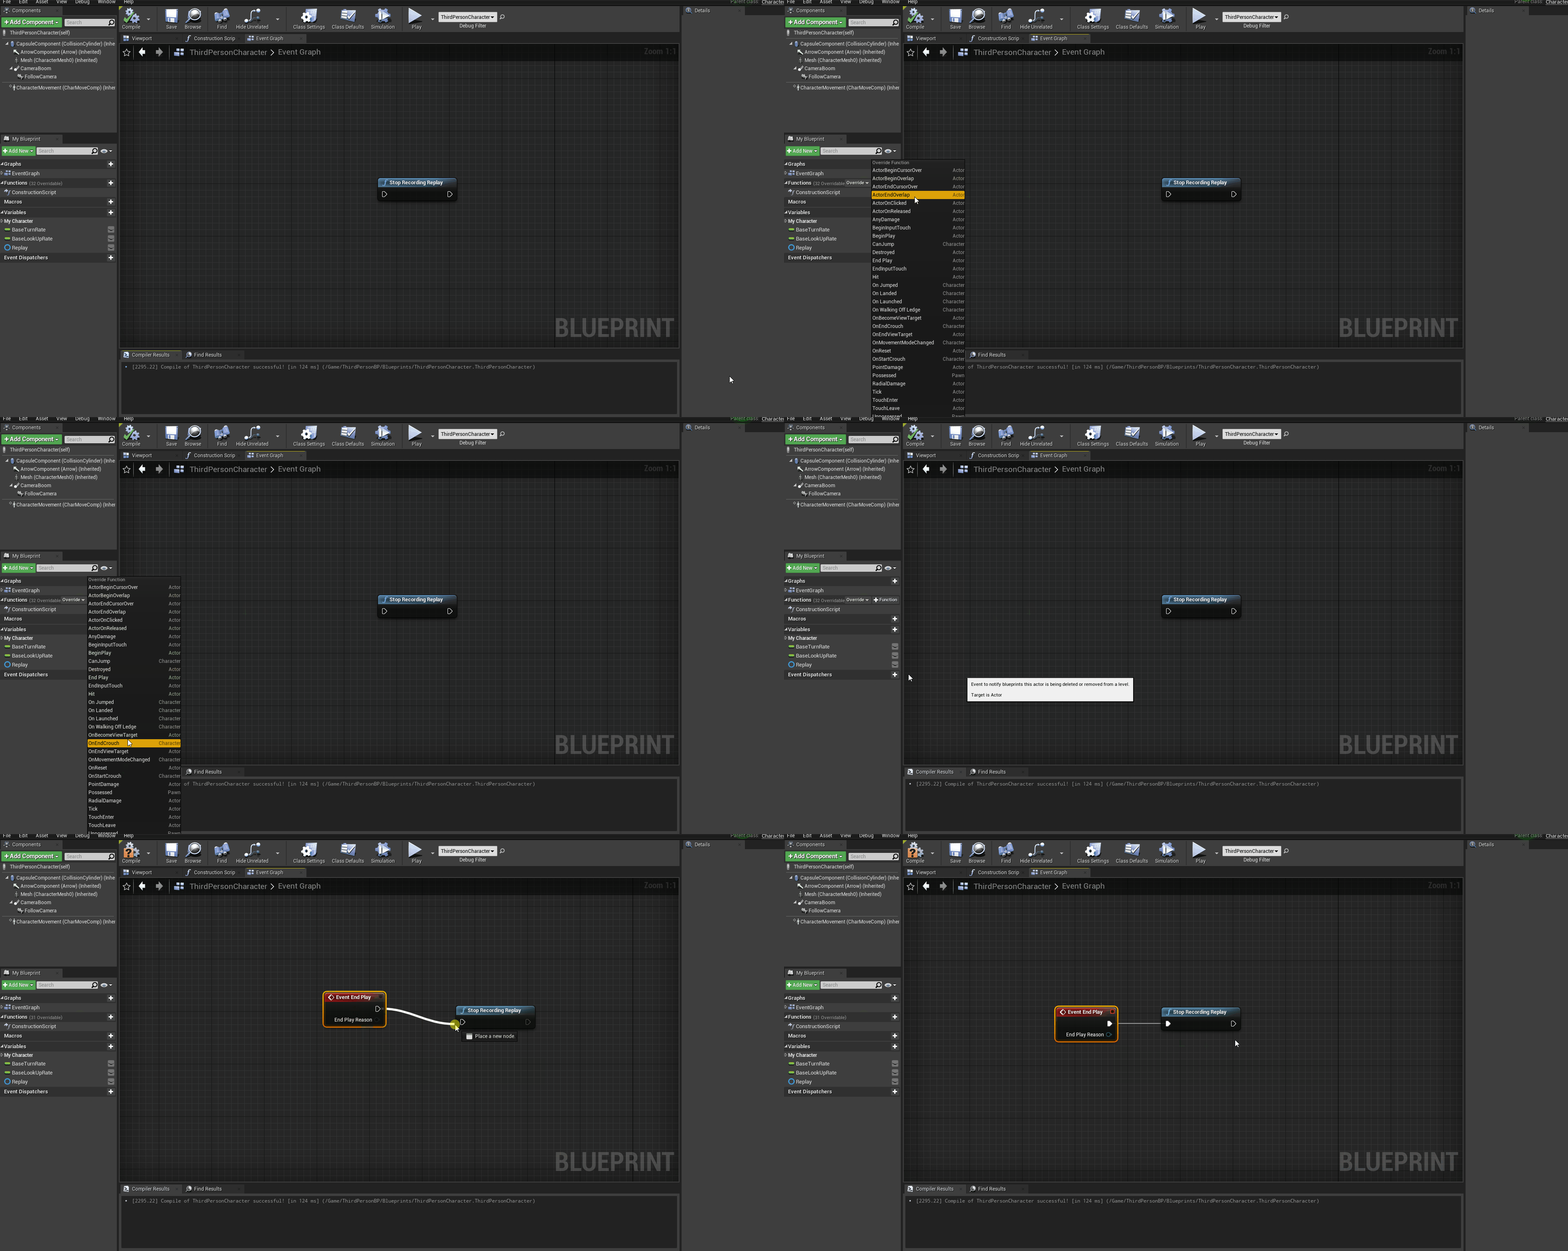
To Stop a recording all we'll need a is the "Stop Replay Recording" node.
Right click on the graph and search for "Stop Recording Replay" and select the "Stop Recording Replay" node.
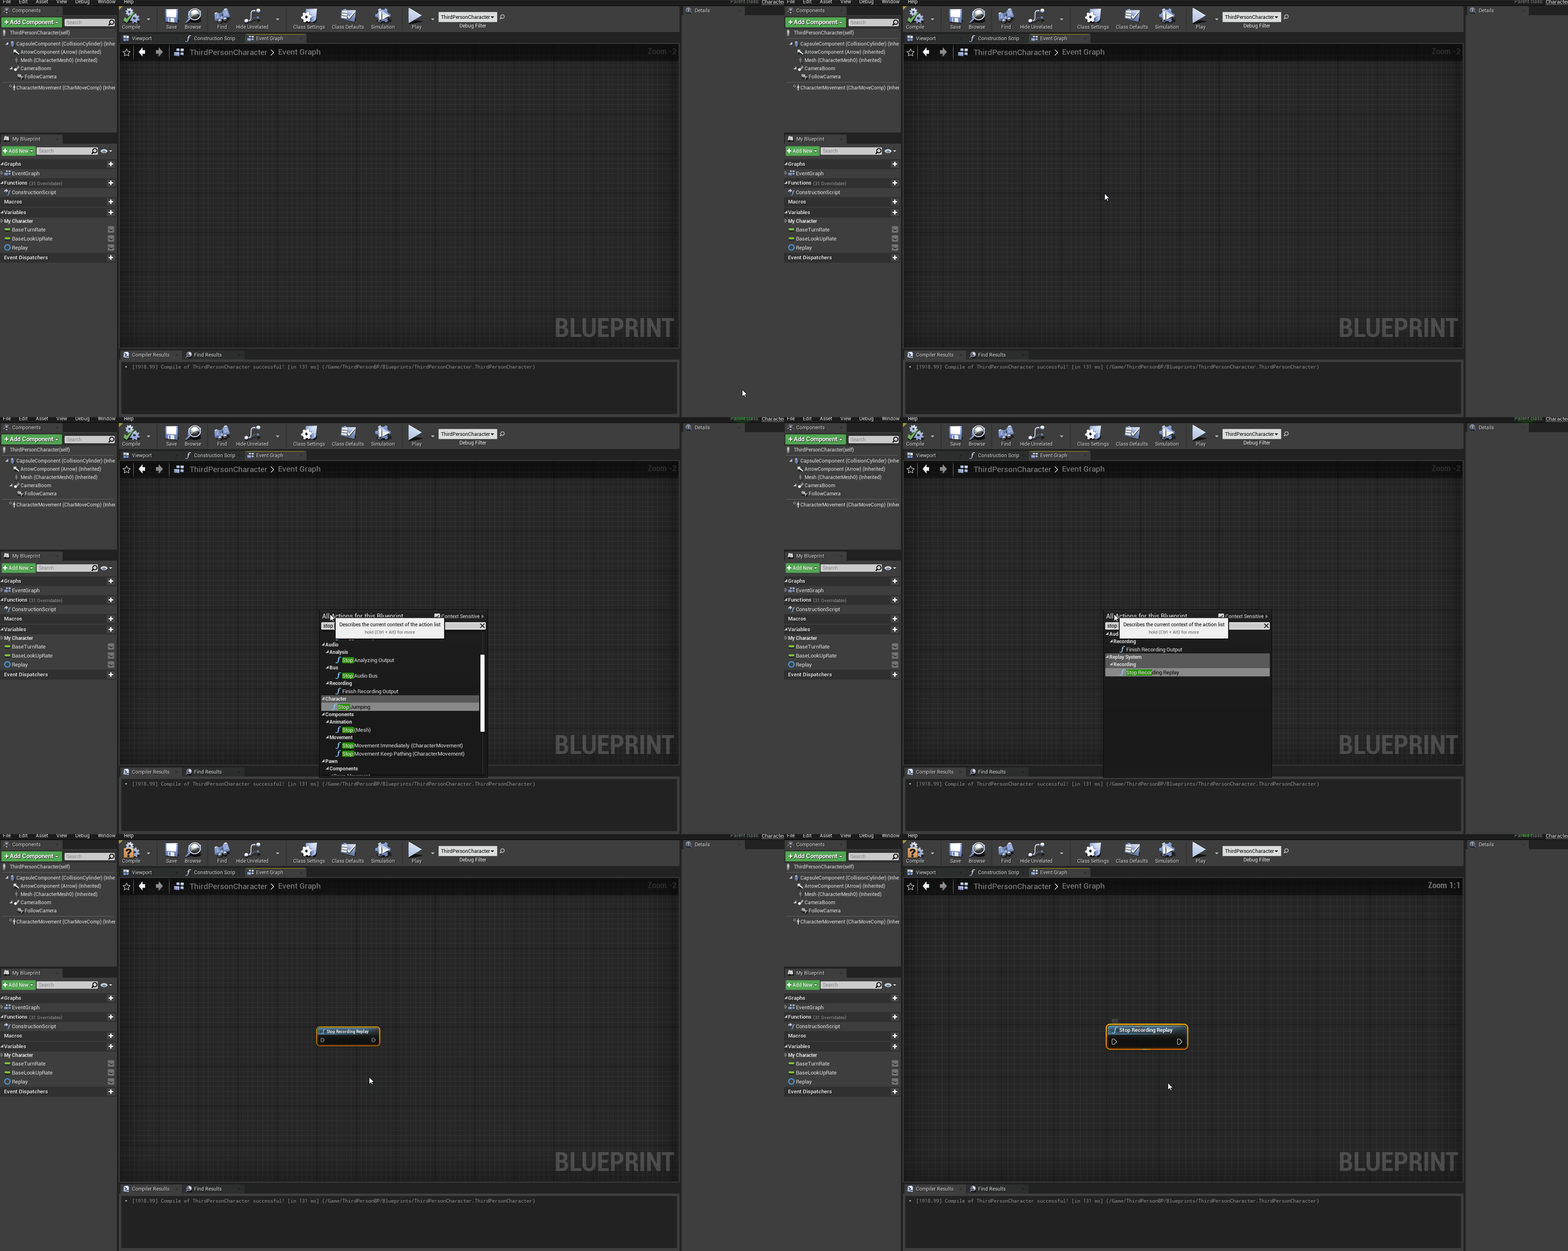
Thats it, now if we connect stop recording to the actor's "EndPlay" event it will stop recording once the actor is destroyed.
(Replays save to disk so if you dont call this the replay will still save but may be corrupted or incomplete)
Playing Replays
Getting Recorded Replays
We can play a replay directly (if you know the name on disk) but if you don't we can just get all the replays on disk
then play the one we want.
To do this all we have to do is use a node called "Get Saved Replays".
Right click on any event graph and search for "Get Saved Replays".
This node can take an instant to run or a few seconds, it all depends on the speed of the drive its being run on.
Drag off from the "Return Value" on the node and search for "Assign On Get Replays Complete".
This will create an event which will be called once all the replays on disk have been loaded.
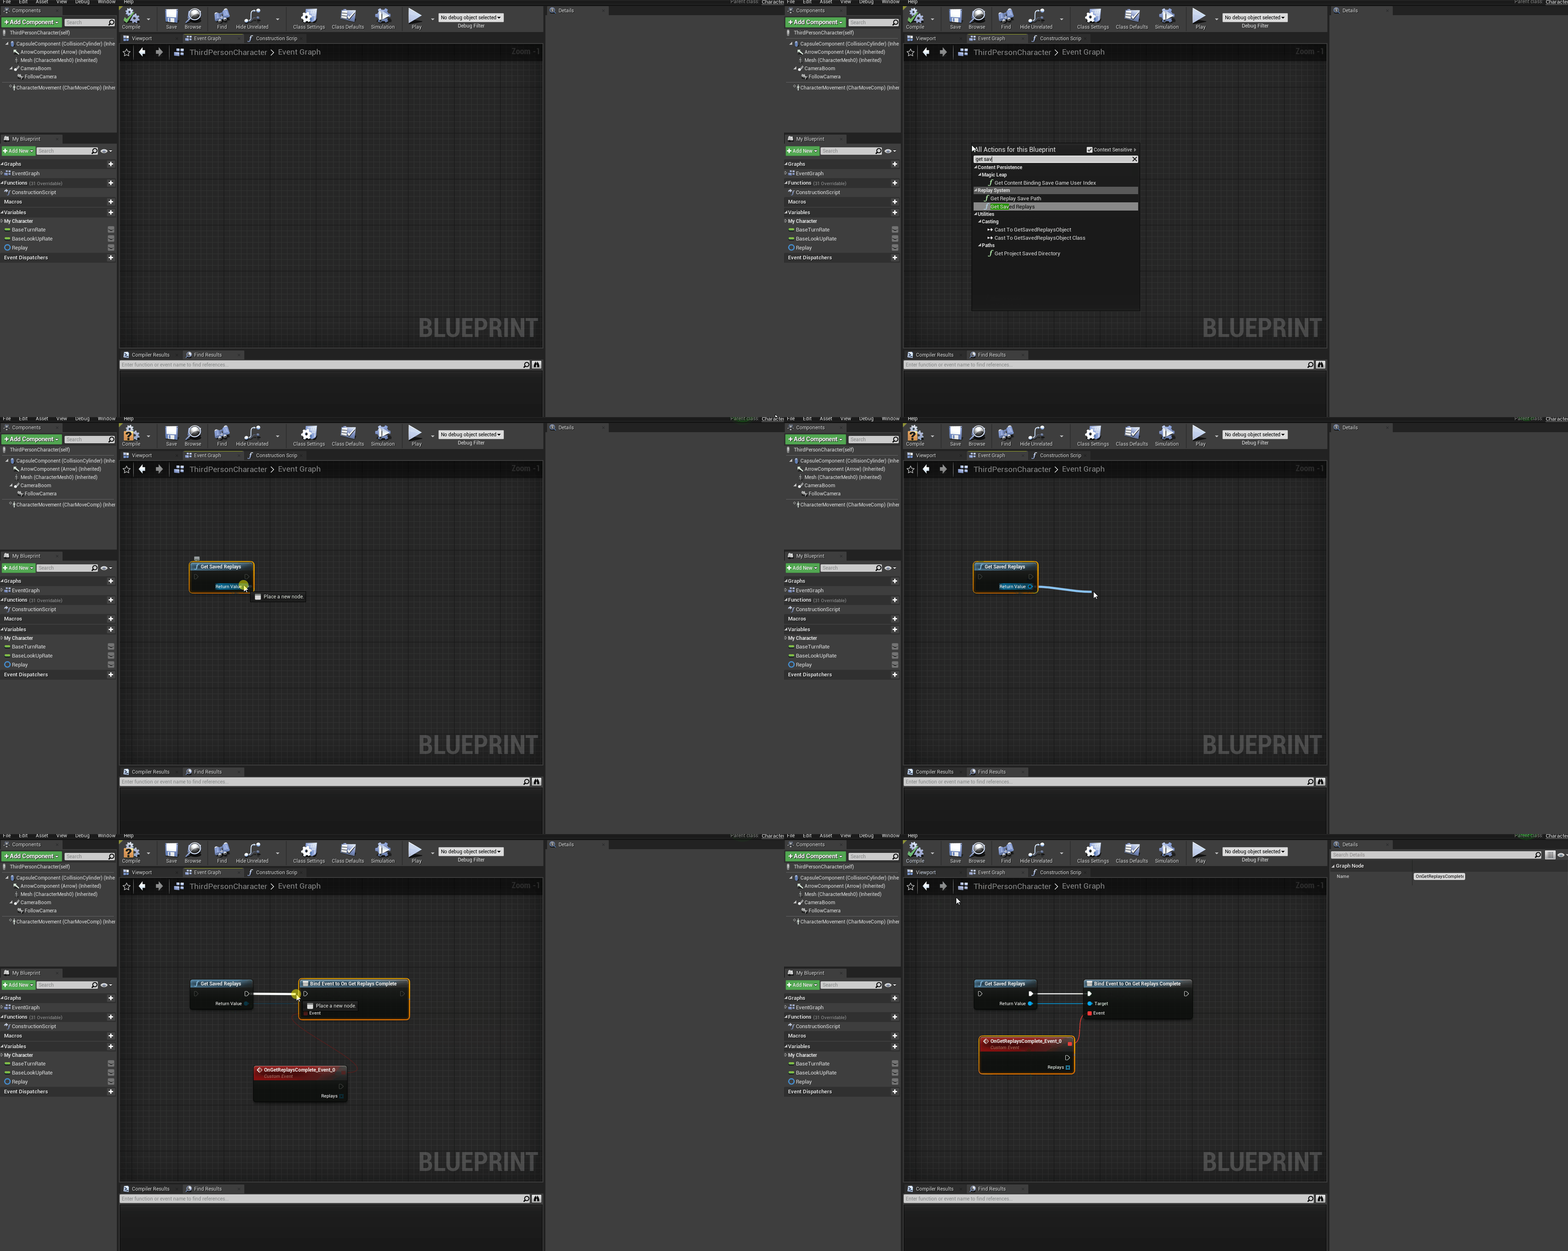
Now we have each replay saved on disk represented as a "Replay Object".
Playing a Replay
Now lets play one of the replays we got from disk above.
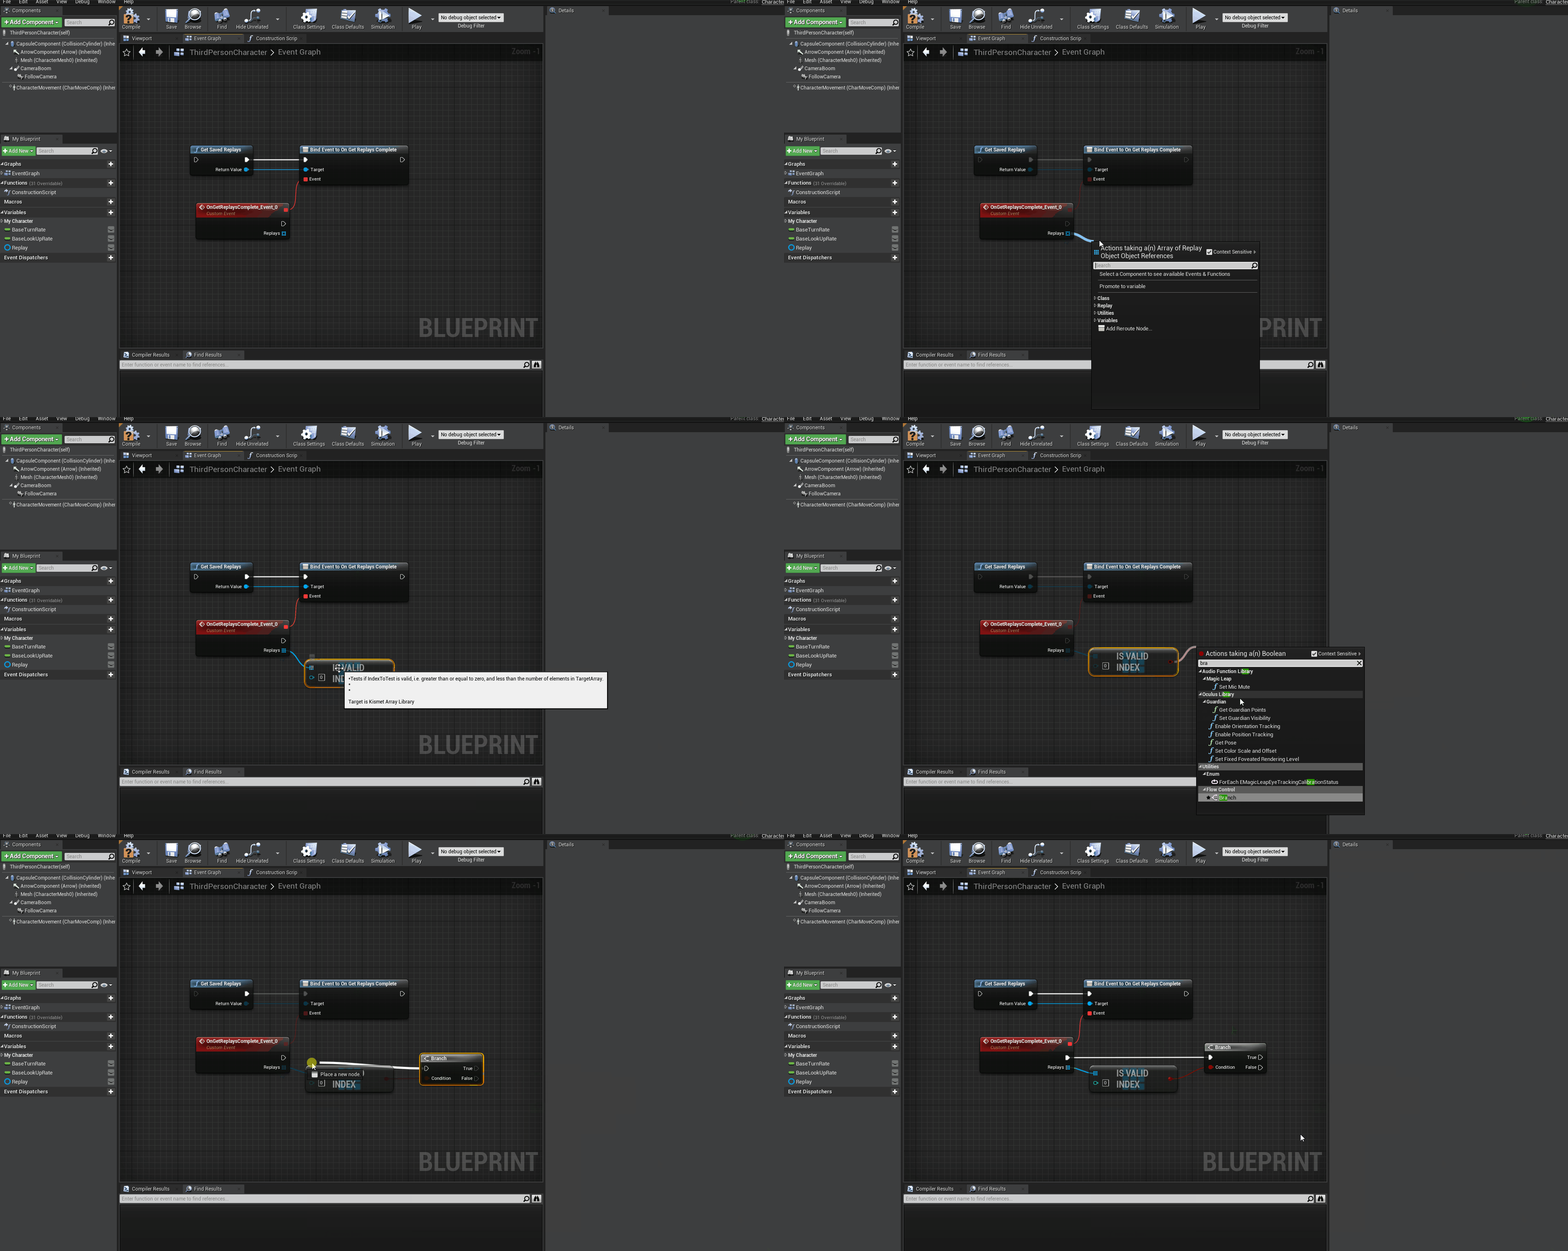
To play the first one we have make sure its valid using an "Is Valid Index" check.
Drag of the array returned by the custom event and search for "Is Valid Index".
Use the return value of the "Is Valid Index" node to create a branch.
We're going to leave the index on 0 since we want to play the first replay.
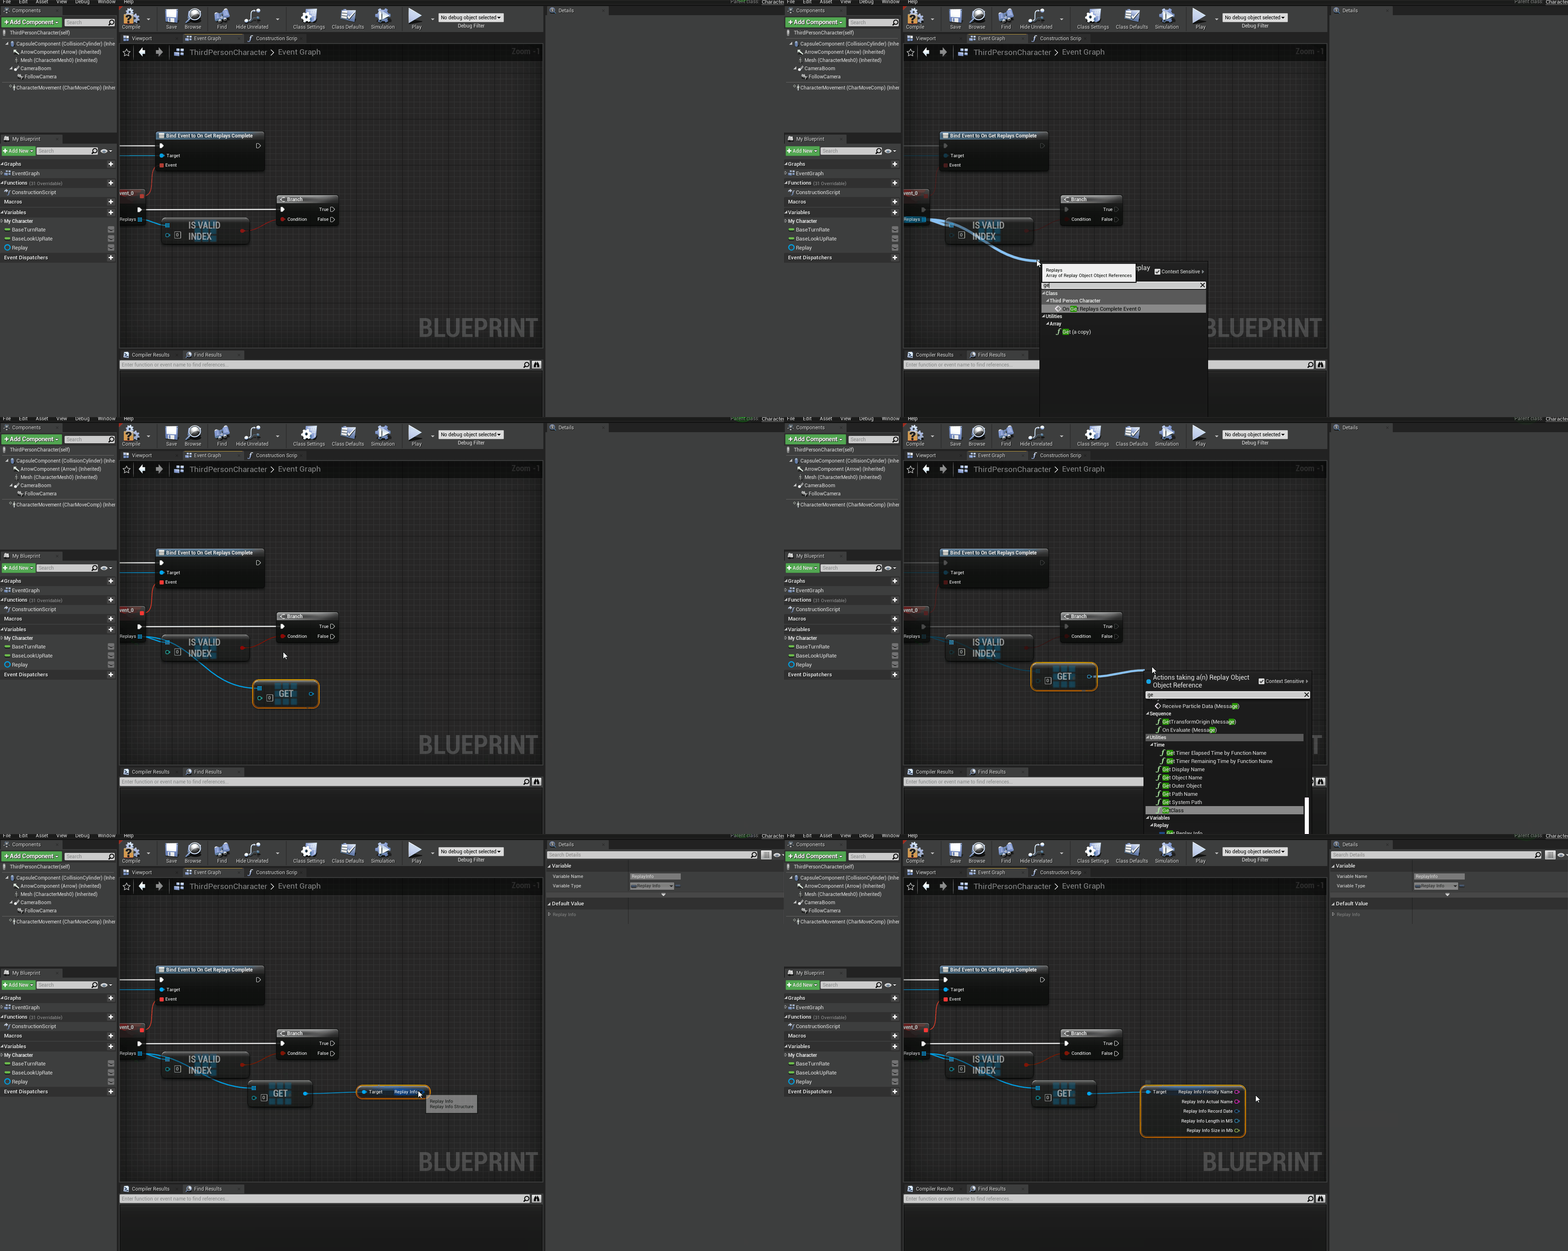
Now we drag of the array returned by the custom event and search for "Get (a Copy)"
drag of the return value "Get (a Copy)" node and search for "Get Replay Info".
This will give us some Information about the "Replay Object" so we know what to play.
Right click on the "Replay Info" node and select "Split Struct Pin" so we can get the information we need.
Finally we can play the replay
Right click on an empty spot on the graph and search for "Play Recorded Replay".
Connect the "Play Recorded Replay" node to the "True" Exec on the "branch".
Then connect the "Actual Name" field on the "Replay Info" structure to the "Replay Name" field on the "Play Recorded Replay" node.
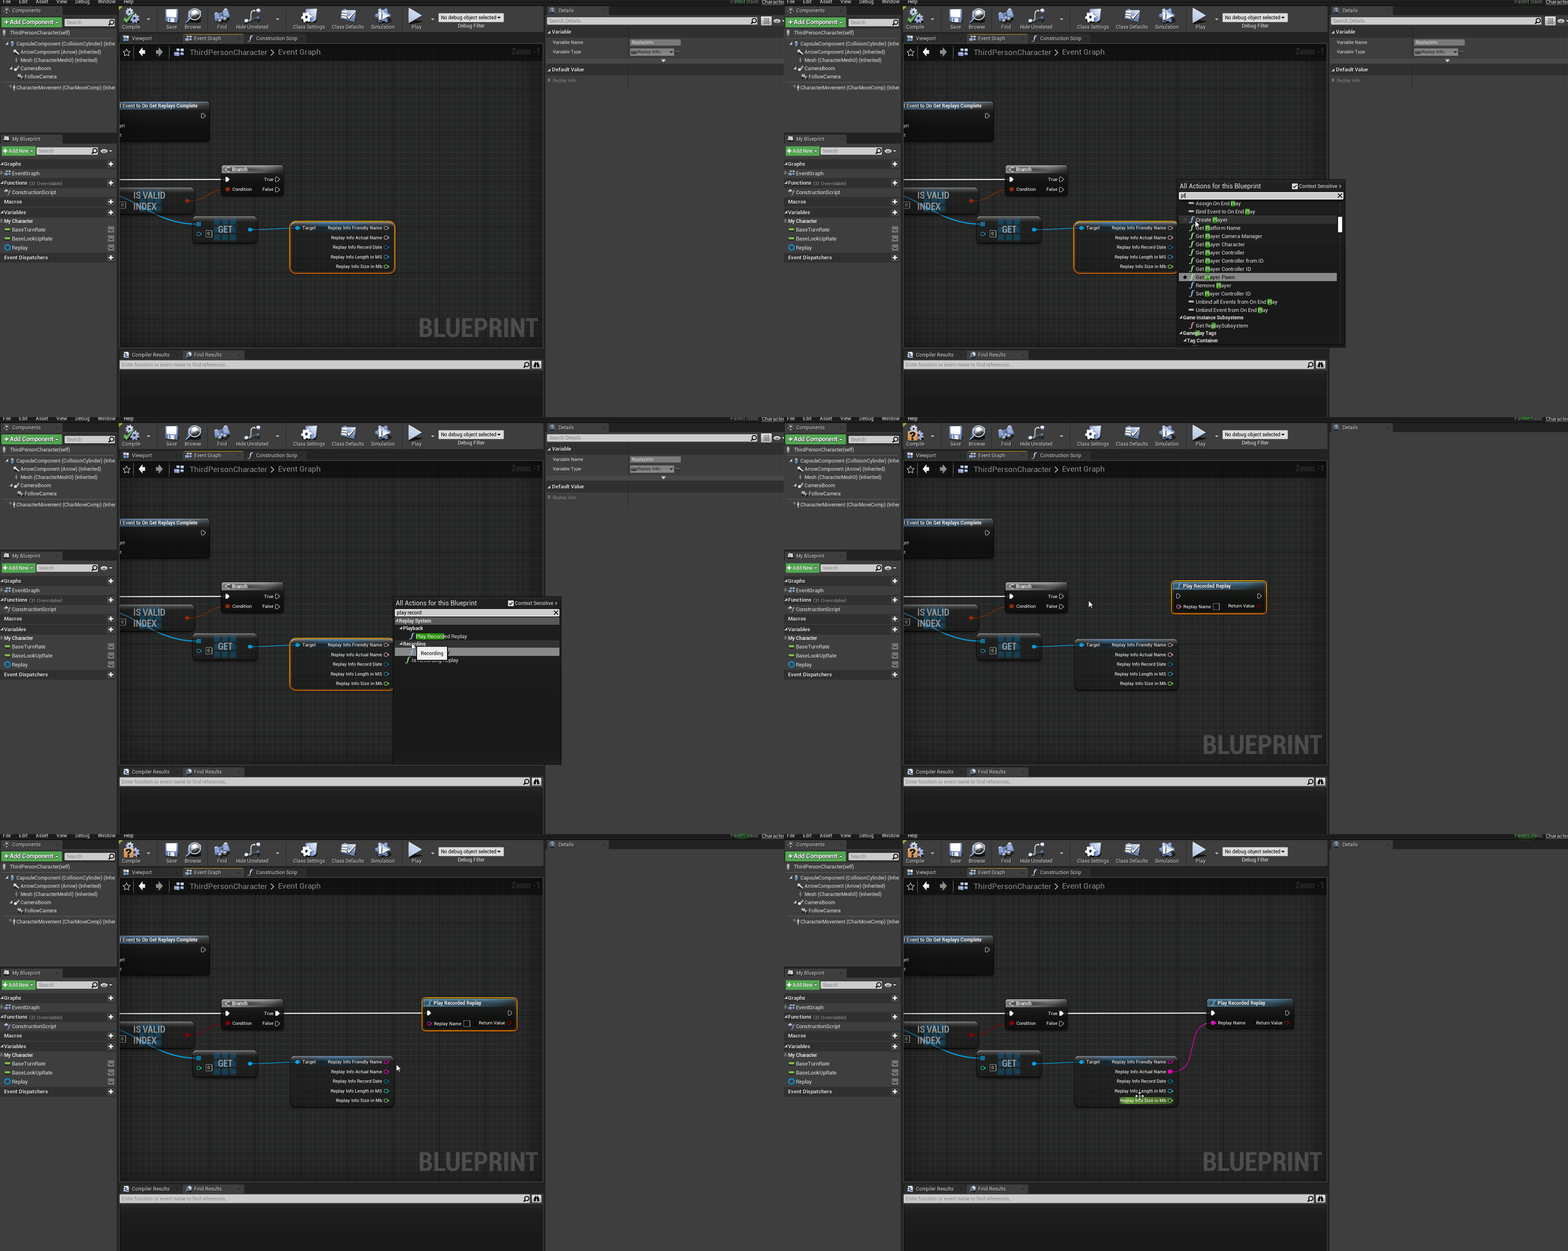
With that, we're done.
Getting Events
There are two ways to get the events of a replay.
You can either get the events from the replay object, or use the "Request Active Replay Events" node.
We are going to go through the first method since we aren't watching a replay and have already gotten the replays from disk.
To get the events of a saved replay we drag of from the "Replay Object"
returned by the "Get (a copy)" node and search for "RequestEvents" node.
Connect it to the "True" Exec of the branch and set the group as MouseClicks.
"Request Events" is also dependent on the speed of your drive so we will drag
off the "Replay Object" again and search for "Assign On Request Events Complete".
This will create an event that will be called once all the events of the MouseClicks
group have been fetched.
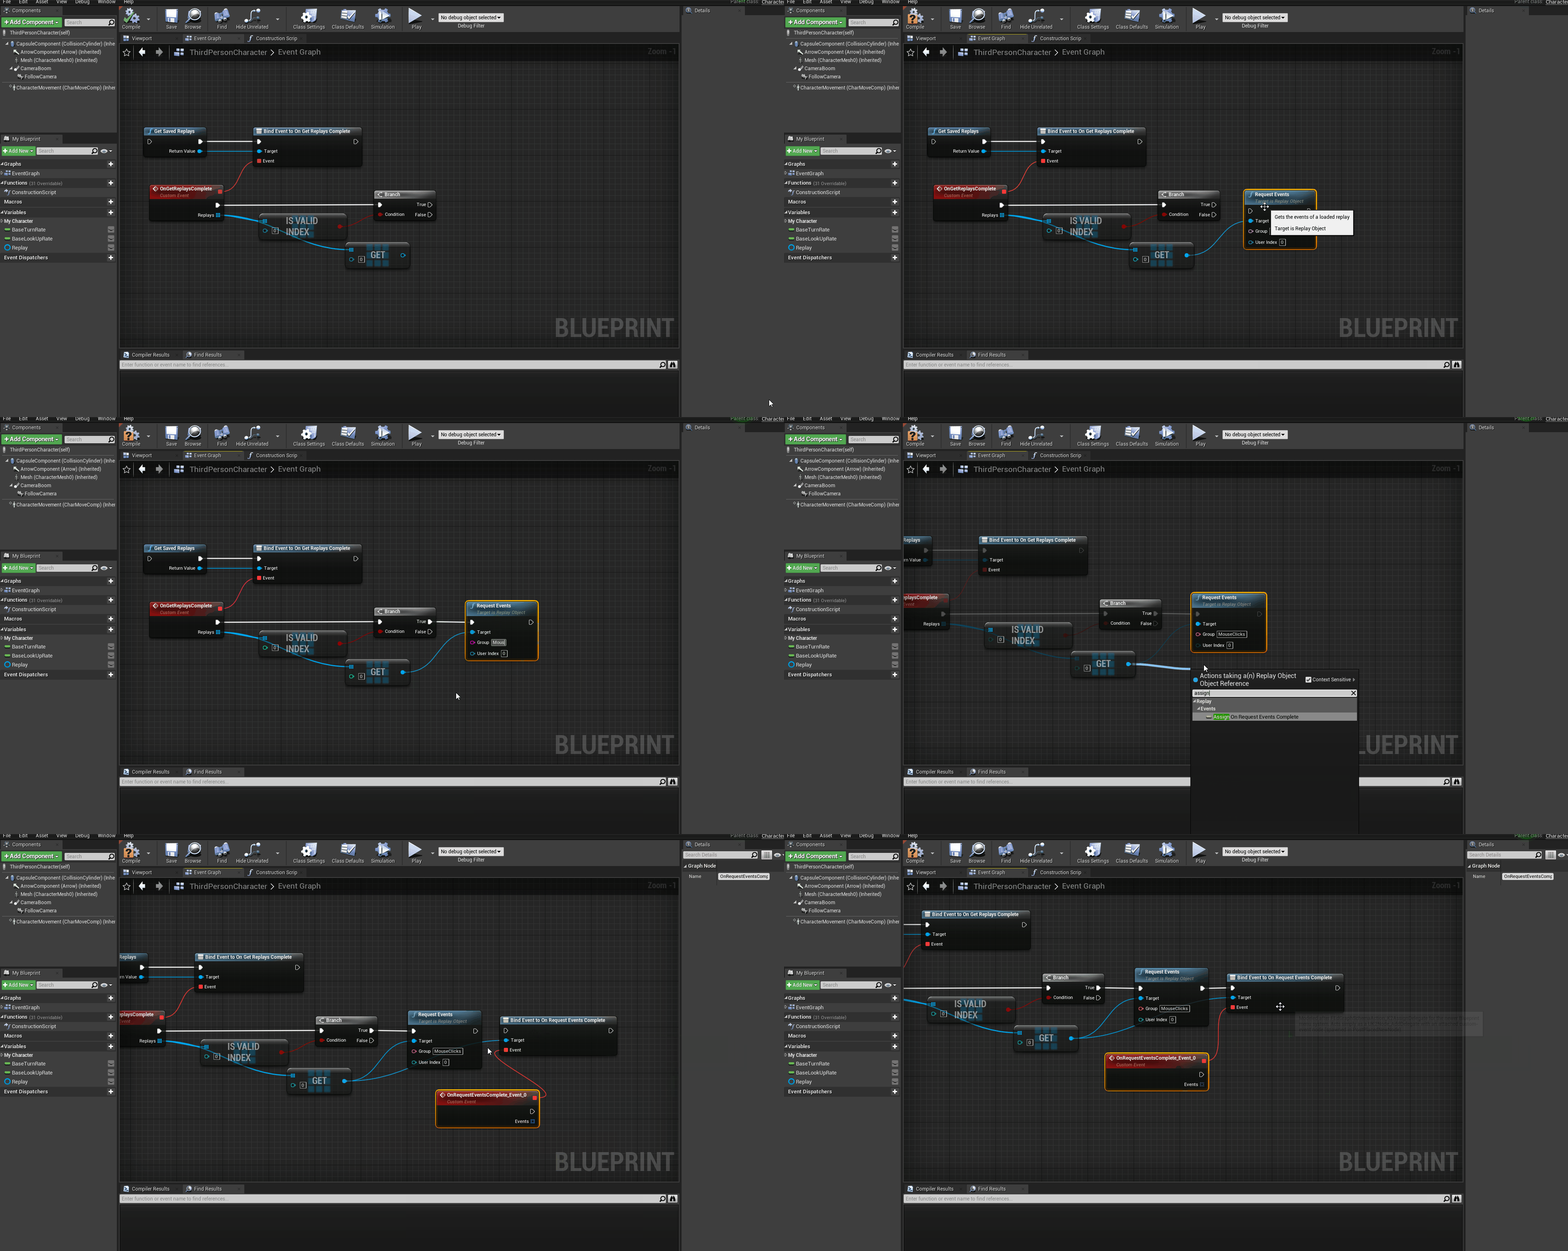
With that we're done.The array returned by the custom event contains all the events of the replay.